MCP Made Easy: The 2026 Guide to Building Your First Model Context Protocol Server
Large language models are powerful, but they usually work in isolation. They do not automatically know your local files, private APIs, internal docs, or database schemas. So developers often write custom “glue code” again and again — one script for one use case, then another for the next.
That approach is slow, fragile, and hard to maintain.
Model Context Protocol (MCP) is the fix. Created by Anthropic, MCP is an open standard that gives AI clients and tools a shared way to communicate. Think of it like a universal USB port for AI: plug in once, connect to many tools safely and consistently.
In this guide, you will learn what MCP is, why it matters in 2026, and how to build a working MCP server in minutes.
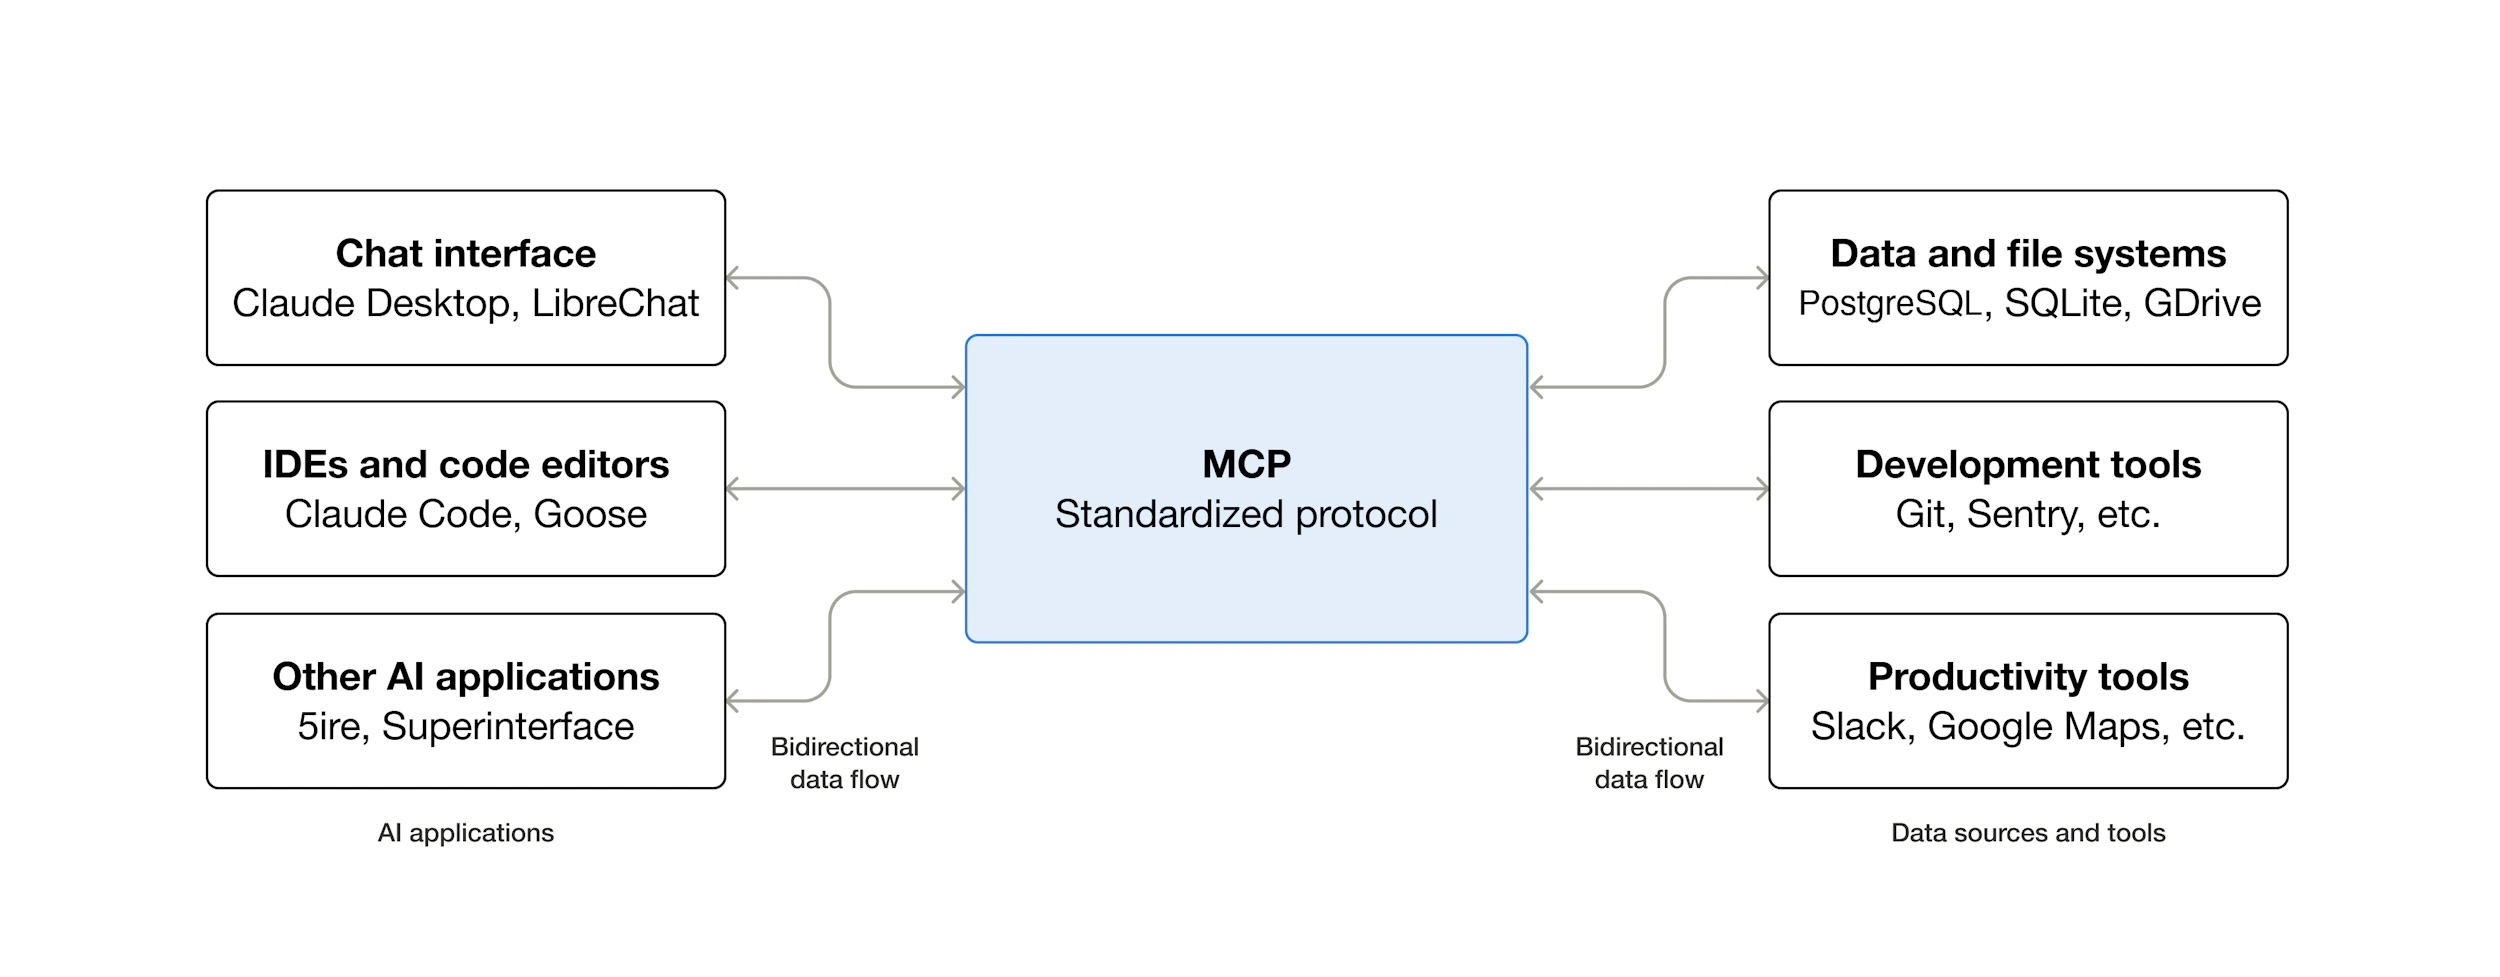
MCP Architecture in Plain English
From the MCP getting-started introduction, the key idea is a simple host-client-server model:
- Host: the app your users interact with (for example, a desktop chat app or an IDE extension).
- Client: the MCP connection inside that host, responsible for talking to one MCP server.
- Server: the integration layer that exposes capabilities in a standard shape.
That server can expose three capability types:
- Tools for actions
- Resources for readable data
- Prompts for reusable instruction templates
This is what makes MCP portable: one standard protocol lets one host work with many servers.
For local development, many setups use stdio; for networked deployment, teams often use HTTP-based transport.
What Is MCP? (The 3 Pillars)
MCP becomes simple once you break it into three parts:
- Tools — Actions the AI can perform (for example: run a function, fetch weather data, query a service).
- Resources — Data the AI can read (for example: files, logs, schema docs, knowledge base entries).
- Prompts — Reusable templates that help users give consistent instructions to the model.
These three pillars make AI interactions more structured, reusable, and production-friendly.
The 2026 Tooling Landscape: Why It Is Easier Now
Early MCP adoption required more setup and more boilerplate. In 2026, the workflow is much smoother.
FastMCP Framework
Modern SDKs — such as the FastMCP patterns in the current Python tooling — reduce server setup to a very small script. You focus on your tool logic, not infrastructure plumbing.
uv Package Workflow
With tools like Astral’s uv, you can install dependencies and run scripts quickly without heavy environment management.
This makes local iteration much faster.
# run a server script directly with uv without managing a virtual environment manually
uv --directory /path/to/your/project run server.py
MCP Inspector
The Inspector gives you a local web UI to test your server before you push it to production. You can verify tool registration, inspect request and response behaviour, and debug quickly — all without touching a client application.
Step-by-Step: Build a Server in 5 Minutes
The following is a practical minimal example that you can run locally today.
Step 1: Setup
Install the MCP library using your preferred tool:
# option A: pip
pip install mcp

# option B: uv
uv add mcp
Create a file named server.py.
Step 2: Code (Simple Local File Reader Tool)
from mcp.server.fastmcp import FastMCP
from pathlib import Path

mcp = FastMCP("local-file-server")

@mcp.tool()
async def read_text_file(path: str) -> str:
    """Read a UTF-8 text file from an absolute path."""
    p = Path(path)

    if not p.is_absolute():
        return "Error: Please provide an absolute path."

    if not p.exists():
        return f"Error: File not found: {path}"

    if not p.is_file():
        return f"Error: Not a file: {path}"

    try:
        return p.read_text(encoding="utf-8")
    except Exception as e:
        return f"Error reading file: {e}"

if __name__ == "__main__":
    m.run(transport="stdio")
This script exposes one MCP tool: read_text_file.
The decorator @mcp.tool() is all it takes to register a function as a callable AI action.
Passing transport="stdio" explicitly makes it clear this server communicates over standard input/output — the default for local MCP servers.
Step 3: Client Configuration (VS Code)
VS Code stores MCP server definitions in a .vscode/mcp.json file at the root of your workspace.
If the file does not exist, create it.
The recommended way to run the server is with uv, pointing it at your project directory:
{
  "servers": {
    "my-mcp-server": {
      "type": "stdio",
      "command": "uv",
      "args": [
        "--directory",
        "/absolute/path/to/your/project",
        "run",
        "src/server.py"
      ]
    }
  },
  "inputs": []
}
Using uv --directory ensures the command runs in the correct project context and picks up your dependencies automatically — no manual virtual environment activation needed.
Important: Use the absolute path to your project directory. Relative paths often fail silently because VS Code launches the process from an unexpected working directory.
After saving the file, open the Command Palette and run MCP: List Servers to confirm your server appears and its status is running.
Step 4: Add the Same MCP Server in Claude Desktop
You can reuse the same server definition in other MCP-capable clients.
Claude Desktop: add an entry to its JSON config file using the mcpServers key:
{
  "mcpServers": {
    "local-file-server": {
      "command": "uv",
      "args": [
        "--directory",
        "/absolute/path/to/your/project",
        "run",
        "src/server.py"
      ]
    }
  }
}
After saving, reload the client and confirm local-file-server appears in the available tool list.
Testing and Troubleshooting
Test Flow
- Save
.vscode/mcp.jsonand open (or reload) your VS Code workspace. - Open the Command Palette and run MCP: List Servers — confirm
local-file-servershows statusrunning. - Open GitHub Copilot Chat (or another MCP-capable client) and verify
read_text_fileappears in the tool list. - Call
read_text_filewith a real absolute file path (for example/Users/you/project/README.md) and check the response.
Common Mistakes
| Problem | Likely Cause |
|---|---|
| Tool not visible in client | Wrong path in config, or the server script crashes on startup |
| Server starts but tool fails | Missing error handling in the async function |
| Works locally but not in client | Relative paths used instead of absolute paths |
Tip: Wrap all file and network operations in try/except and return meaningful error strings.
MCP clients often surface the return value directly to the user, so a clear message is much more helpful than a silent failure.
What Comes Next
Once you have your first tool working, the next steps are natural:
- Add more tools — each new
@mcp.tool()function expands what your AI can do. - Expose resources — use
@mcp.resource()to let the model read files or structured data on demand. - Add prompt templates — use
@mcp.prompt()to create reusable instruction patterns for common workflows.
flowchart LR
    A([AI Client]) -->|MCP Protocol| B([Your MCP Server])
    B --> C[Tools\ne.g. read_text_file]
    B --> D[Resources\ne.g. log files, schemas]
    B --> E[Prompts\ne.g. reusable templates]

    style A fill:#1e3a5f,color:#93c5fd
    style B fill:#14532d,color:#86efac
    style C fill:#1e3a2f,color:#86efac
    style D fill:#1e3a2f,color:#86efac
    style E fill:#1e3a2f,color:#86efac
Conclusion
MCP is no longer a niche experiment — it is becoming a standard way to connect LLMs with real systems. Instead of writing one-off wrappers for every project, you build reusable, testable interfaces that work across different clients and use cases.
Your next step is simple: pick one repetitive manual task — reading logs, querying internal docs, checking service health — and turn it into your first custom MCP tool.
Once you do, you stop “prompting around limitations” and start building real AI workflows.